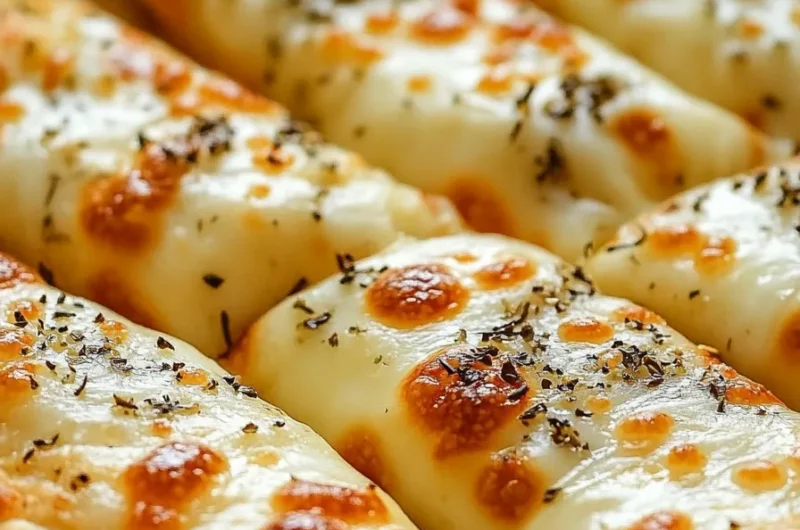
Homemade Cheesy Breadsticks are a delicious treat that combines the comforting flavors of cheese with the satisfying crunch of freshly baked bread. There’s something incredibly satisfying about making them from scratch, ensuring every bite is filled with gooey, melted cheese and the perfect seasoning. Whether you’re looking for a perfect snack, a side dish for your favorite pasta, or simply a way to impress your family and friends, these breadsticks will surely deliver a delightful experience.
Imagine sinking your teeth into a warm, cheesy stick that is crisp on the outside and soft on the inside. The aroma fills your kitchen, making it hard not to indulge before they even cool down. What’s more, the versatility of this recipe allows you to customize the flavors and textures to suit your preferences. Whether you love a hint of garlic, a sprinkle of herbs, or a rich, cheesy blend, the options are endless.
As we dive deeper into this recipe, you’ll discover its simplicity and how it perfectly bridges the gap between being quick to prepare yet impressively delicious. From the ingredient list to the step-by-step instructions, you’ll find everything you need to create the ultimate cheesy breadsticks right at home. Let’s explore why you’ll fall in love with this recipe!
Why You’ll Love This Recipe
Homemade Cheesy Breadsticks are not just food; they are an experience. Here’s why this recipe should become a staple in your cooking repertoire:
1. Quick and Easy: With simple ingredients and straightforward steps, you won’t need to spend hours in the kitchen.
2. Customizable Flavors: You can easily tweak the ingredients to suit your taste, whether you prefer extra garlic or perhaps some chili flakes for a kick.
3. Perfect for Sharing: These breadsticks make an excellent party snack or appetizer, and people will love to share them around.
4. Family-Friendly: Kids and adults alike will enjoy the cheesy goodness, making them a hit even at family gatherings.
5. Versatile: Pair them with marinara sauce, pesto, or enjoy them solo; the choices are endless!
6. Freshly Baked Goodness: There is nothing quite like the smell of warm, fresh breadsticks coming out of your oven to make your home feel inviting.
With all these enticing factors, you can’t help but want to whip up a batch of these amazing cheesy breadsticks!
Preparation and Cooking Time
Getting those Homemade Cheesy Breadsticks ready will take approximately 30-40 minutes, from preparation to baking. Here’s a quick overview of the breakdown:
– Preparation Time: 15 minutes
– Cooking Time: 15-20 minutes
– Cooling Time: 5 minutes
With such a short overall time commitment, you’ll have fresh Homemade Cheesy Breadsticks in no time!
Ingredients
– 2 cups all-purpose flour
– 1 tablespoon baking powder
– ½ teaspoon salt
– ½ teaspoon garlic powder
– 1 cup shredded mozzarella cheese
– ¼ cup grated Parmesan cheese
– ¾ cup milk
– 1 tablespoon olive oil
– 1 tablespoon melted butter (for brushing)
– Optional: Fresh herbs (like parsley or basil)
Step-by-Step Instructions
Creating delicious Homemade Cheesy Breadsticks is simple! Just follow these easy steps:
1. Preheat Your Oven: Start by preheating your oven to 425°F (220°C). This ensures your breadsticks bake evenly.
2. Mix Dry Ingredients: In a large mixing bowl, combine the flour, baking powder, salt, and garlic powder. Stir until well mixed.
3. Add Cheeses: Fold in the shredded mozzarella and Parmesan cheese to the dry mixture. This will create a cheesy flavor throughout.
4. Combine Wet Ingredients: In a separate bowl, whisk together the milk and olive oil until combined.
5. Make the Dough: Pour the wet mixture into the dry ingredients, stirring until it forms a dough. Avoid over-mixing.
6. Knead the Dough: Turn the dough out onto a floured surface and gently knead it for a minute. Aim for a smooth texture but don’t overdo it.
7. Roll Out the Dough: Roll the dough into a rectangle about ½ inch thick. Cut strips approximately 1 inch wide and 4-6 inches long for individual breadsticks.
8. Arrange on Baking Sheet: Place the cut breadsticks onto a greased baking sheet, leaving space between them for expansion.
9. Brush with Butter: Melt the butter and brush it generously over the tops of the breadsticks. This adds flavor and gives them a golden color.
10. Bake: Place the baking sheet into the preheated oven and bake for 15-20 minutes or until they turn golden brown and are cooked through.
11. Cool Slightly: Remove from the oven and let the breadsticks cool for about 5 minutes. This allows them to firm up slightly.
12. Serve Warm: Enjoy your delicious, cheesy breadsticks while they’re warm!
How to Serve
Serving Homemade Cheesy Breadsticks is just as important as making them. Here are some suggestions to create an unforgettable experience:
1. Dipping Sauce: Pair your breadsticks with marinara sauce, ranch dressing, or garlic butter for a delightful dip.
2. Garnishing: Sprinkle with fresh herbs like parsley or basil for a burst of color and flavor.
3. Presentation: Use a serving platter, arranging the breadsticks in a fanned-out style to make them visually appealing.
4. Freshly Baked Aroma: Serve as soon as they’re out of the oven to showcase their warm, inviting scents.
5. Pair with Meals: These breadsticks complement various dishes, from pasta to soups, making them perfect for dinner gatherings.
With these ideas, your Homemade Cheesy Breadsticks will not only taste amazing but will be a perfect addition to your dining table, impressing all who have the pleasure of tasting them!
Additional Tips
– Use Fresh Ingredients: For the best results, use fresh ingredients, especially cheese and herbs.
– Don’t Over-Knead: When kneading the dough, aim for a smooth consistency but avoid overworking it to keep the breadsticks tender.
– Experiment with Seasonings: Feel free to add other spices like smoked paprika or Italian seasoning for extra flavor.
– Serve Immediately: These breadsticks are best enjoyed fresh out of the oven while they’re warm and gooey.
– Try Different Cheeses: Experiment with various cheeses like cheddar, gouda, or a blend for a unique taste.
Recipe Variation
Get creative and try these delicious variations of your Homemade Cheesy Breadsticks:
1. Herbed Breadsticks: Add dried herbs into the dough, like oregano or thyme, for a fragrant twist.
2. Stuffed Breadsticks: Roll out the dough and fill it with cooked spinach and ricotta cheese before sealing and baking.
3. Spicy Cheese Breadsticks: Incorporate crushed red pepper flakes into the dough for a spicy kick.
4. Sweet Variation: For a dessert twist, use cinnamon sugar in place of garlic and serve with a sweet dipping sauce.
Freezing and Storage
– Storage: Keep any leftover breadsticks in an airtight container at room temperature. They’ll stay fresh for 2-3 days.
– Freezing: To freeze, wrap individual breadsticks in plastic wrap and place them in a freezer-safe bag. They can last up to 2 months.
– Reheating: To reheat, place in a preheated oven at 350°F (175°C) for about 5-10 minutes until warmed through.
Special Equipment
While making Homemade Cheesy Breadsticks requires only basic kitchen tools, having a few handy can help:
– Mixing Bowls: For combining dry and wet ingredients.
– Rolling Pin: To roll out the dough evenly.
– Baking Sheet: A standard sheet for placing the breadsticks.
– Parchment Paper: (optional) To line your baking sheet for easier cleanup.
– Brush: For applying melted butter on top before baking.
Frequently Asked Questions
Can I make these breadsticks gluten-free?
Yes, you can substitute all-purpose flour with a gluten-free flour blend.
What can I serve the cheesy breadsticks with?
They pair wonderfully with marinara sauce, garlic butter, or a side salad.
How do I know when the breadsticks are done baking?
They should be golden brown on top and sound hollow when tapped on the bottom.
Can I double this recipe?
Absolutely! Just make sure to use larger baking sheets or bake in batches.
What type of cheese works best?
Mozzarella is traditional, but feel free to use any cheese that melts well.
Conclusion
Homemade Cheesy Breadsticks are a delightful addition to any meal or snack time, bringing joy with every cheesy bite. Their irresistible aroma and cheesy goodness will undoubtedly make them a household favorite. From their quick preparation to the endless customization options, these breadsticks are perfect for sharing or simply indulging on your own. Whip up a batch today and bring a taste of warmth and coziness into your home!
Homemade Cheesy Breadsticks: The Amazing Ultimate Recipe You Need!
- Total Time: 39 minute
Ingredients
– 2 cups all-purpose flour
– 1 tablespoon baking powder
– ½ teaspoon salt
– ½ teaspoon garlic powder
– 1 cup shredded mozzarella cheese
– ¼ cup grated Parmesan cheese
– ¾ cup milk
– 1 tablespoon olive oil
– 1 tablespoon melted butter (for brushing)
– Optional: Fresh herbs (like parsley or basil)
Instructions
Creating delicious Homemade Cheesy Breadsticks is simple! Just follow these easy steps:
1. Preheat Your Oven: Start by preheating your oven to 425°F (220°C). This ensures your breadsticks bake evenly.
2. Mix Dry Ingredients: In a large mixing bowl, combine the flour, baking powder, salt, and garlic powder. Stir until well mixed.
3. Add Cheeses: Fold in the shredded mozzarella and Parmesan cheese to the dry mixture. This will create a cheesy flavor throughout.
4. Combine Wet Ingredients: In a separate bowl, whisk together the milk and olive oil until combined.
5. Make the Dough: Pour the wet mixture into the dry ingredients, stirring until it forms a dough. Avoid over-mixing.
6. Knead the Dough: Turn the dough out onto a floured surface and gently knead it for a minute. Aim for a smooth texture but don’t overdo it.
7. Roll Out the Dough: Roll the dough into a rectangle about ½ inch thick. Cut strips approximately 1 inch wide and 4-6 inches long for individual breadsticks.
8. Arrange on Baking Sheet: Place the cut breadsticks onto a greased baking sheet, leaving space between them for expansion.
9. Brush with Butter: Melt the butter and brush it generously over the tops of the breadsticks. This adds flavor and gives them a golden color.
10. Bake: Place the baking sheet into the preheated oven and bake for 15-20 minutes or until they turn golden brown and are cooked through.
11. Cool Slightly: Remove from the oven and let the breadsticks cool for about 5 minutes. This allows them to firm up slightly.
12. Serve Warm: Enjoy your delicious, cheesy breadsticks while they’re warm!
- Prep Time: 15 minutes
- Cook Time: 15-20 minutes
Nutrition
- Serving Size: 12 breadsticks
- Calories: 200 kcal
- Fat: 8g
- Protein: 8g